Video Transcript: What are Single Leg Hop Tests?
My name is Dr. Brian Royer and I’m here with some healthy hints for harmony. Today we’re gonna be talking about single-hop tests. And basically these hop tests are gonna be great functional assessments in order to help to figure out whether or not a person is doing an appropriate activity for them.
A lot of times after an injury athletes want to start to push things the little bit too early, want to get back into this sport. And this is one way to actually figure out whether or not a person is ready to return to a sport after they’ve been injured. The thing is that when it comes to running, is that, when you’re jumping from leg to leg, which is basically obviously what running is. That’s one way that you can actually hide imbalances, which between the legs and weakness ain an injured leg.
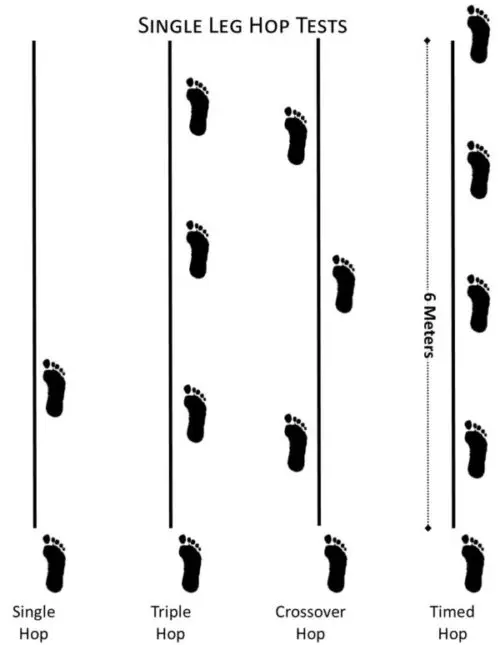
So the single hop test you’re doing with a single leg hop. You’re staying on one leg the entire time and you’re hopping. And that will help to bring out differences from side to side. So again, this is something that can be with the entire lower extremity. So the foot, the ankle, the knee, the hip and it also has a little bit to do with the low back and the core. And again, it’s a reliable way of finding problems with those kind of patients. It helps to assess balance and it’s gonna assess coordination, general functional mobility, and also occupational performance and strength, specifically in that leg.
So again, if somebody can pass one of these tests when they’re done, then you pretty much know that they’ve been properly rehabed. And if they haven’t tested it, or if they haven’t passed it, then that can be something that’s a little bit more problematic.
You can actually also compare yourself between other people with this test because you can measure like your inseam length and you can see like how tall that leg is compared to how far that you actually go. And you can do percentages that way, but that’s not really what’s important. For this, this is gonna be basically trying to be looking at, comparing it with yourself side to side, to see whether or not you’re basically balanced or not.
So now we’re gonna talk about doing the hop test at home. And basically what you’re gonna do is you’re gonna need something in order to help you to kind of measure how well you’re doing with it. So basically, you need something to mark where you start from and mark where you stop from. The way that we did it is that we actually have a measuring tape that’s here on the ground.
So you need about six meters and six meters is about 19 feet and eight inches, something along those lines. It’s better to do it off of the meters because the meters is the way that the testing is actually done. But if you start off with a line, a chalk line on the ground, and that’s where you start from. And then you do the jump and then you mark on the ground with the chalk. You do it at the toe, where your front toe is. So you start, if this is where the line is, you start with your toe on the line. You do the hopping, and then when you end, you’re gonna mark at the end where the toe ends at the big toe.
So basically you’re gonna go through and you’re gonna do that. You can start and go out on the uninjured leg and then come back to your start. And then go out again on the injured leg, or you can go out and then come back and see if you hit where you started from, and how close that you get to. So there’s a couple different ways that you can do it. It may depend on how much pain or problems that you’re feeling when you’re trying to do it and why you’re trying to do this.
And when it comes down to it again, there’s a couple of different ways to do it. So another thing is that you need something to hop over, which is the reason why we end up having the measuring tape there. When you do the crossover test, you need to go from side to side on it, each time that you jump. So you have to be careful, obviously, because you don’t wanna actually land on whatever you put on the ground and then slip. So you have to be careful about that.
But this is one way that you can do it in order to get an idea of how the leg feels and whether or not you should be actually like going out and running on it or trying to stress it. And really you’re trying to look at the differences side to side. And the first thing is, does it feel different? So if you have an injured leg and the injured leg feels different, or it doesn’t feel as strong as the other one, then the numbers and stuff like that doesn’t necessarily matter.
But if you get to the point where the legs feel about the same side to side, then you may want to be a little bit more specific with the measurements. And this would be something where you could come somewhere, that somebody could actually help you with it and actually do it for you. Or you can try to do the measuring yourself. And in that case, you want there to be less than a 10% difference in the distance that you hop or in the time that it takes to do the hop.
So the six meter test is that hopping and trying to get through it as fast as you can. Again, the timeframe shouldn’t be different, so it shouldn’t be super slow on the injured leg compared to the uninjured leg. But there’s math involved with this. So the way that you’re gonna end up doing the math that’s associated with it is that you’re gonna end up having, if you’re talking about a 10% difference, you’re gonna take the differences between the distances that you hop or times that you hop. And then you’re gonna divide that by the larger distance.
So for example, if on the bad leg, you do 3.75 meters and on the good leg, you do four meters. The difference between that is 0.25, and you take 0.25 divided by four, and that gets you 6.25%. If you’re talking about let’s say that you did it in a different time or a different person, again, that’s just using rounder numbers, but if it was 3.5 meters and four meters, the difference being 0.5 meters divided by four is gonna be 12.5%. So the one that’s at 12.5%, that would technically be a failure. Whereas, the 6.25% isn’t gonna be a failure. So again, there’s gonna be the differences between those. So that’s gonna be how you’re gonna do it.
Now we’re gonna actually take a look so you can actually see how those tests are actually done. Okay.